
ValNav Integration
Usage and configuration guide for the integration of Execute’s Budgeting and Forecasting module and Value Navigator.
Overview
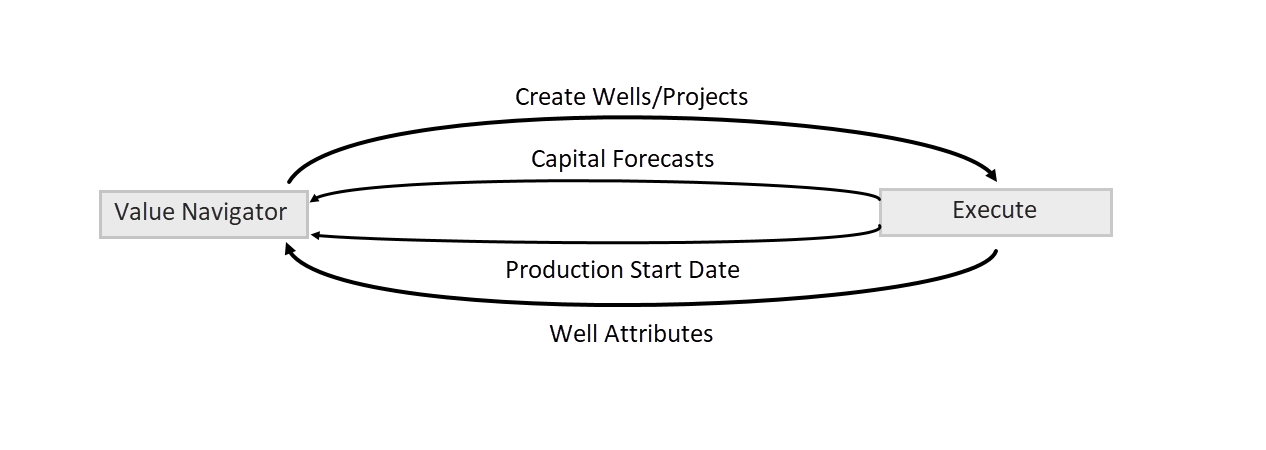
The integration between Value Navigator and Execute allows:
- An Execute administrator to import Wells (Projects) from Value Navigator into Execute’s Budgeting and Forecasting module to serve as the starting point for a capital budget, and constructing an operational schedule.
- An Execute user to publish updated capital forecasts, production start date, and other attributes from Execute back into Value Navigator, enabling up-to-date reporting on capital, OpEx and production from one system (Val Nav).
Requirements and Assumptions
This integration requires Execute 2020 (or higher) and Val Nav 2020 (or higher).
-
The integrations are initiated from within Execute. Successful integration requires that Execute is able to contact Value Navigator (typically, this means both systems are installed on the same network).
- Execute reads data directly from the Value Navigator database. This means that Execute will need to be configured with read-only access to the Value Navigator database.
- Execute writes data to Value Navigator through the Val Nav Integration Service. This service must be correctly installed, and accessible to Execute.
- A “Project” in Execute must map 1:1 to a single Entity (in a specific Plan & Reserves Category) in Val Nav.
- A “Project Activity” in Execute must map 1:1 with a Cost Type (i.e. “Drilling (CDE)”, “Seismic (CDE)”, …) in Val Nav (although the names do not necessarily need to be identical).
- Production forecasts in Val Nav are recommended to be decline equations for daily-granularity syncing (array forecasts in VN are only to monthly granularity).
- The Val Nav database is strongly recommended to be either Oracle or SQL Server.
Setup
Installing and Configuring the Val Nav Integration Service
In order to push information from Execute into Value Navigator, the Val Nav Integration Service must be installed and correctly configured. The full details of that are beyond the scope of this document, but what follows is a summary.
- The installer for the Val Nav Integration Service must be obtained from Val Nav support. Note that the version of the Val Nav Integration Service must match the version of Val Nav.
- While not a strict requirement, it is typically best to install the Val Nav integration service on the same server that is hosting Execute. This greatly simplifies configuration.
-
Edit the configuration for the Val Nav Integration Service (
Eni.ValueNavigator.IntegrationService.exe.config) to provide:- Path to the Val Nav Project File (.vndl)
- License key
-
ServiceUrl =
http://localhost:8081
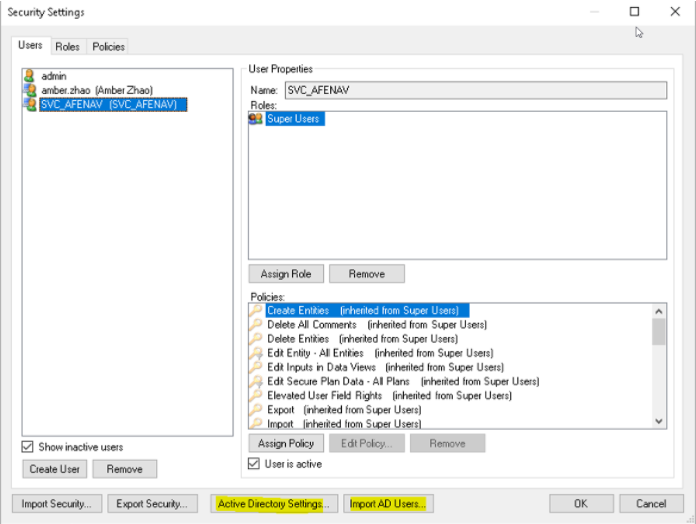
- Ensure that the “Val Nav Integration Service” is configured to run under the same domain service account that Execute’s service is configured with.
- Restart the Val Nav Integration Service after making the above configuration changes.
- Ensure that said service account has access rights to the VN database (e.g., an associated login in SQL Server).
- Ensure that the domain account exists in Val Nav, and is configured with appropriate permissions.
Click image to expand or minimize.
Verifying the Installation of the Val Nav Integration Service
Once configured, the Val Nav Integration Service can be tested by visiting http://localhost:8081/swagger/ui/index from a web-browser on the machine running the Val Nav Integration Service. This will display the API documentation.
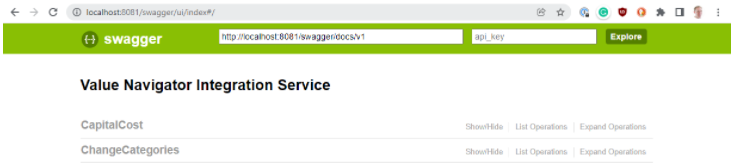
Using the swagger interface, run /api/system and verify it returns successfully. The version numbers returned in the Response Body will help helpful to aid in any future troubleshooting.

The above should return a Response Body like the following. A failure here would most likely indicate issues connecting to the underlying Val Nav database, or a mismatch between the Val Nav Integration Service, and Val Nav.
	{
	   "DatabaseFilePath": "C:\\files\\vn_execute_integration_sql.vndl",
	   "ServiceUserName": "SVC_AFENAV",
	   "ValNavVersion": "21.2.0.3",
	   "ValNavSchemaVersion": "2021.2.0.2",
	   "IntegrationServiceVersion": "21.2.0.34",
	   "ConnectionState": "Connected",
	   "ServiceLogFilePath": "C:\\...\\Value Navigator Integration Service.log"
}
Next, run /api/currency and verify it returns successfully.

It should return a currency like the following:
"$US"
If the above two tests succeed, the Val Nav Integration Service is probably configured correctly.
Configuration of Execute
Now that Val Nav is configured, the next step is to configure Execute:
- Enable the Val Nav integration plugins (pointing Execute to the appropriate Val Nav DB and Integration Service).
- Configuring the mapping of Project Activity Types to Val Nav Cost Types.
Enabling the Val Nav integration plugins
To enable the import of Projects from Val Nav, copy
plugins_available/project/valnav/valnav_project_import_oracle.config.sample or
plugins_available/project/valnav/valnav_project_import_sqlserver.config.sample to
plugins/valnav_project_import.config.
Modify the connectionString to point to your Val Nav database (for security reasons, a read-only database user is preferred).
<component id="dataProviderFactory_{##UNIQUE##}" service="Eni.AfeNavigatorServer.Framework.Data.IDataProviderFactory" type="Eni.AfeNavigatorServer.Framework.Data.SimpleDataProviderFactory" lifestyle="transient">
<parameters>
<!-- Adjust this section to include connection information to Val Nav -->
<providerType>SqlServerProvider</providerType>
<connectionString>Data Source=ServerName;Initial Catalog=DatabaseName;Integrated Security=False;User ID=DatabaseUser;Password=DatabasePassword;MultipleActiveResultSets=True</connectionString>
</parameters>
</component>
To enable the push of Capital and Production Forecast Start date from Execute into Val Nav, copy plugins_available/project/valnav/valnav_project_export.config.sample to plugins/valnav_project_export.config. No changes should be required for this configuration file assuming Execute and the Val Nav Integration Service are installed on the same machine.
Ensure that you always restart the Execute service after making changes to plugin files.
allowUpdatesToExistingProjects setting in valnav_project_import.config.<!-- Allow system to update existing projects with data from Val Nav? -->
<allowUpdatesToExistingProjects>true</allowUpdatesToExistingProjects>
Pushing Working Interest into Val Nav
If you wish to push the Project-level capital interest from Execute into Val Nav, set the exportWorkingInterestFlag property in valnav_project_export.config to true.
Note: The working interest from Execute does not in fact go to the working interest field in VN, but rather to the capital cost interest. Due to the potential input complexity in VN, the following rules are applied:
- Updates leases only for enabled companies
- Updates any/all product interests (including General interest) for those leases
- Updates the before-payout (BPO) reversions only
- And only when the existing input WI is non-null and greater than zero. This will allow updating crown/freehold splits, but the split factor must be modeled via a tract or pooling factor, not via different working interests on the leases. It will also support keeping receivable interests intact by not updating them if they have no WI.
<exportWorkingInterestFlag>true</exportWorkingInterestFlag>
Pushing Additional Attributes to Val Nav
If you wish to push additional Project-level attributes from Execute to Val Nav, modify the wellAttributes section. Here is an example:
<wellAttributes>
<array>
<item>
<field>COUNTRY</field>
<expression>doc.ReadTextField("CUSTOM/COUNTRY")</expression>
</item>
<item>
<field>CUSTOM FIELD 2</field>
<expression>doc.ReadDateField("PROJ_START_DATE")</expression>
</item>
<item>
<field>NAME</field>
<expression>doc.ReadTextField("NAME")</expression>
</item>
</array>
</wellAttributes>
Each item identifies an additional value to push from Execute into Val Nav. The field property is the field name you would like to export into on the Val Nav side. The expression is a short expression that extracts (and potentially modifies) the value from Execute to be pushed into Val Nav.
The http://localhost:8081/swagger/ui/index#!/EntityProperties/EntityProperties_GetEntityProperties API can be used to get a list of available Val Nav field idenfiers, such as:
[
{
"Name": "Well Type",
"Id": "WELL_TYPE",
"IsCustom": false
},
{
"Name": "Country",
"Id": "COUNTRY",
"IsCustom": false
},
{
"Name": "State/Province",
"Id": "PROVINCE",
"IsCustom": false
},
{
"Name": "Field",
"Id": "FIELD",
"IsCustom": false
},
{
"Name": "Custom Field 1",
"Id": "d38dfa8d-a5f6-4e18-9493-4b9beeeb8669",
"IsCustom": true
},
{
"Name": "Custom Field 3",
"Id": "f775d1a3-683e-497e-ac1d-df2112f69fdd",
"IsCustom": true
}
]
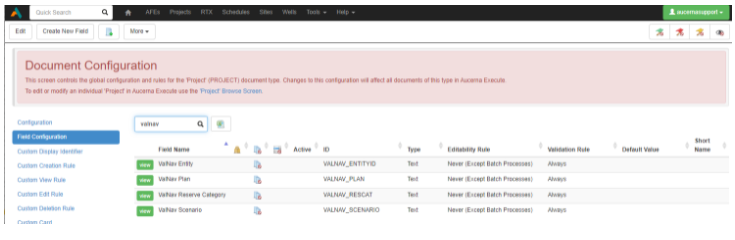
Enabling the Val Nav Fields in Execute
Execute includes several out-of-the-box Project fields (hidden by default) that are used by the Val Nav integration. Thought not required, it is recommended that these fields be marked as “Active” and “Listable” so that they can be seen in Execute. This vastly simplifies troubleshooting.
The fields are:
-
PROJECT.VALNAV_ENTITY
-
PROJECT.VALNAV_PLAN
-
PROJECT.VALNAV_RESCAT
-
PROJECT.VALNAV_SCENARIO
Correctly configured, they should look like this:
In addition, to enable the mapping of Project Activity Types to Val Nav Cost Types (required), you must also enable the PROJ_ACTIVITY.VALNAV_COST_TYPE field.
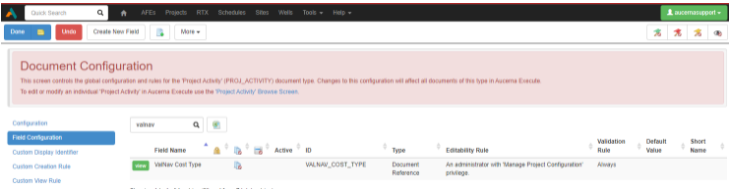
Mapping Project Activities
The final step is to configure Execute based on the Val Nav capital types.
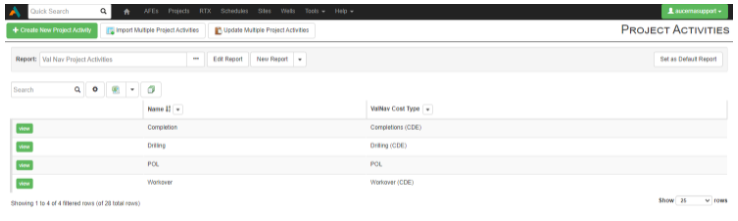
Each in-use Val Nav Cost Type must be added to Execute (Tools > Configuration > Val Nav Cost Types (view)). Note that this list must include the POL (Production Online placeholder activity). Note that these names must match, exactly (including capitalization), what is in Val Nav. For example:

Next, Project Activity types must be created and mapped to each Val Nav Cost Type (note that these do not need to match the Val Nav Cost Type name).
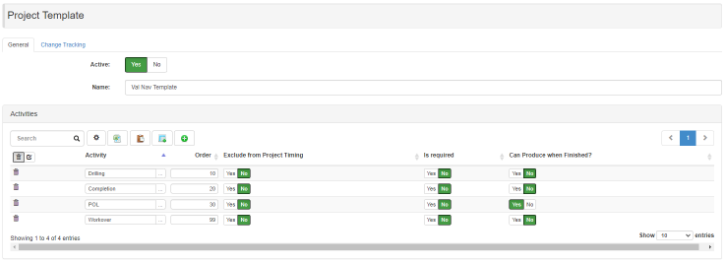
Finally, a new Project Template must be created for projects loaded from Val Nav. This template must be called Val Nav Template (this can be modified in the import plugin, if required).
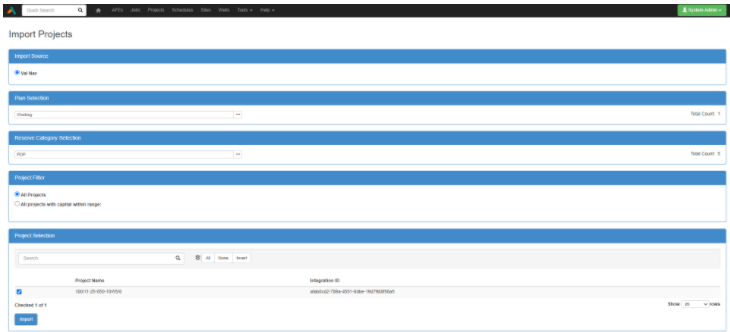
Importing Projects from Val Nav
Once configured, administrators with the Import Project administrator privilege will be able to import Projects from Val Nav.
To do so, select Tools > Import Projects.
- Choose the Reserve Category you’d like to import from.
- Choose a date window (Projects with capital in a specific time-frame) or unfiltered.
- Choose specific Projects to import.
A log window will display any errors encountered during the import.
Once the import completes, the new Projects will be available in Execute to be adjusted and included in a budget.
Pushing Updates to Val Nav
An administrator with Export Projects is able to push updated capital, production forecast start date, and attributes from Execute into Val Nav.
To do so, select Tools > Export Projects.
- Select which Project(s) to push to Val Nav.
- (Optionally) verify that there are no issues pushing into Val Nav.
- Export to Val Nav.
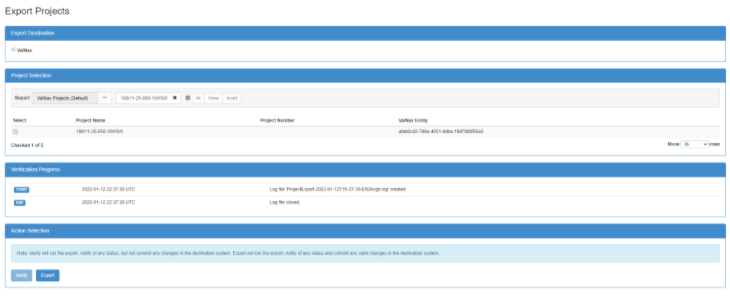
A log window will display any errors encountered during the export.